Using a spectrophotometer to measure color doesn’t necessarily mean you’re going to capture accurate data. The most common reason for incorrect measurements and inconsistent readings among instruments is using the wrong device settings. Today we’ll look at five things you must consider when setting up your device and taking measurements.
-
Illuminant and Observer angle
The illuminant describes the color of the light under which you’re judging colors. To accurately determine how the color will look at it’s destination, you need to choose an appropriate device illuminant. The ISO has defined the standard lighting for print graphics as D50, which is roughly the same lighting ambience as noon daylight. Other industries have different illuminant standards, which may be supported by your instrument and software.
The observer angle setting varies from industry to industry, and the ISO has specified 2-degree for measuring printed material. In some instruments, the illuminant and observer angle are combined into one setting. This will usually read as “D50 2-degree.”
-
Minus paper or Absolute
Since ink is semi-transparent, the instrument reads not only the ink density, but also the paper density. In certain regions such as Europe, printers do density in Minus paper mode to remove the paper variable so they are only measuring the ink film thickness. Printers in the North America typically use density absolute, which means the density number includes both the ink density and the paper density. When measuring color (L*a*b*), that is always a combined ink and paper measurement.
-
Backer color
Since the background can impact measurement results, backers are included in the ISO standard. Some specifications, such as density readings and double-sided printing, require a black backer. Others require white. ISO provides L*a*b* values for both black and white backers, and G7 provides targets values based on white backers. Confirm which is best for your application, and make sure you’re using the right set of target values for your backer.
Since backer color can have a large impact on measurements, ISO 13655 establishes procedures for measurements. For example, if the ink room provides a target measurement for a customer-specified spot color on a white backer, but the pressroom measures on a black backer, the pressman must adjust his press to match the numbers as closely as he can. He may have to adjust density lighter to get his numbers to pass, but in reality, the color is out of tolerance.
Although tempting, don’t measure on a stack of press sheets. Always use a backer.
-
Status T vs. Status E
If you’re measuring density, there are different standards for density calculations that you must consider: Status T, Status E, Status A and Status I. The one you choose will depend on your location and the industry you are in. The North American standard for density measurement in the Graphic Arts industry is Status T, and in Europe it is Status E.
-
Aperture size
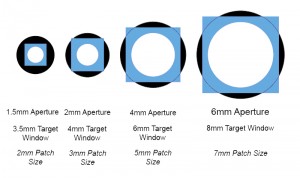
Many devices can be ordered with multiple aperture sizes. Aperture should be chosen based on the patch size and screening range.
- 1.5mm aperture: Recommended for a patch size of 2-3mm with a screening range of 175 lines/inch (69 lines/cm) or above.
- 2mm aperture: Recommended for a patch size of 3-5mm with a screening range of 133 lines/inch (52 lines/cm) or above.
- 4mm aperture: Recommended for a patch size of 5–7mm with a screening range of 65 lines/inch (26 lines/cm) or above.
- 6mm aperture: Recommended for a patch size of 7mm or larger.

The black circle represents the target window opening, the white circle represent the actual measurement area (aperture size), and the blue square represents the minimum suggested patch size.
Be consistent
Once you choose the correct settings for your application, make sure all of your instruments and software are set up the same, or you’ll end up with conflicting results.
Not sure which spectro is best for your needs? It depends on what you’re measuring. Check out our Using Spectros for Print, Packaging & Manufacturing post to learn more.

